Saturday, September 12, 2015

Parallel Lines Activity

Today, all 6 of my geometry classes were supposed to take a quiz on angle relationships when parallel lines are cut by a transversal and move on to parallel, perpendicular or neither.  I knew yesterday by 2nd period that they wouldn't do well if I forced them to take the quiz at the beginning of class today.  So a plan was hatched and a trip to Dollar Tree was planned.

The plan was to tape the floor with two parallel lines cut by a transversal.  The more I thought about it, the more pieces I created.  The trip to Dollar Tree only yielded a roll of pretty duct tape and a roll of navy blue masking tape.  I went there to look for more traffic cones, but they were all gone.  I had bought 8 traffic cones from there about 4 years ago and have never used them!  Finally, they had a use!! I had 2 red, 2 orange, 2 yellow, 1 blue and 1 purple and I needed them in pairs.  So I could only use the red, orange and yellow ones and it worked just fine.

Here's a pic of my floor taped.  Those are electrical plugs in my floor!


Here's a pic of my "tools".  Six signs with angle pair names, 3 pairs of colored cones, a timer to keep us on track, post-its for solving (one pair for congruent angles, one for supplementary) and student names on strips to pull at random (color-coded by class).  The next pic is of student whiteboard and marker storage. 


The students grabbed a whiteboard, marker and a chair and sat in a semicircle around the taped lines.  I explained how it worked and we got started.  I would show everyone a sign with an angle pair and place it on the floor.  Then, 2 random students were chosen and given cones.  They would place the cones in the correct angles.  If they had trouble on the first round, they could get help.  Once the cones were placed, they were asked if those angle were congruent or supplementary.  At that point, I would stick the post-its and have them use the whiteboards to solve for the variable.  In some classes, we got thru the first round without anyone needing help so I would give two cones to a student and have them challenge another student.  They would place their cone then challenge a student to find an angle that was, say corresponding to it.


I had one student that is hard to reach tell me that it was fun and thanked me for doing the activity!!!!  I had so much fun and it was such a productive activity (grades on quizzes after activity were better than expected!) that I invited my math coach and fellow geometry teachers to watch during their planning period.  They plan on using it next week for their students as well!!

What a perfect way to end the week!! SUCCESS!!


Wednesday, August 5, 2015

#MTBoSBlaugust... Start, Stop and Continue

Start:
-journal writing once or twice a week (answer essential questions in section of interactive notebook and write weekly reflections on a form on my website)
-adding bell work and journal sections to the interactive notebook, joining activities and vocabulary sections already implemented.
-planning with two other Geometry teachers at my school (admin has carved out time for us to meet every other week, all week if we choose!)
-taking a leadership role at my school
-using more inquiry and group activities, less bookwork

Stop:
-lecturing as a whole group 
-having students write all notes (give guided notes and facilitate discussions instead)
-answering questions that other students would benefit from answering.

Continue:
-using the interactive notebooks
-using standards based grading for quizzes (but get better and more consistent with retakes and documentation of practice prior to retakes)
-stalking blogs and Pinterest for new ideas!

Sunday, August 2, 2015

#MTBoSBlaugust...Top 5 Tips for New Teachers


#MTBoSBlaugust...Show Us Your Classroom


Here is a previous post as I worked on my classroom.
I had to buy this the other day at Walmart! Perfect for a Geometry teacher!

I have heard so much about the glue sponges and thought I would try them this year for our interactive notebooks. So far I love them and they only cost about $10 for all 12.  The containers are 2 for $1 at Dollar Tree, the sponges were also 2 for $1 at Dollar Tree and glue was free (inherited from previous teacher in my room) but I figured $1 for 2 bottles, which was all I needed.

One of my tables and sloppily covered chair (which I'll fix tomorrow).

My teacher station: computer and document camera, not set up yet!

My podium has two pockets charts, one on each side. This side contains my flip chart folders I use every year for anecdotal notes. Read about them here.

The crates with color-coded hanging folders will hold students tests and quizzes and other artifacts of learning. Gotta move the extra plastic containers.

Garbage cans for trash from interactive notebooks, green crate is the "while you were out" absent work container, blue crate for whiteboards, markers and erasers, and the pink trays for turning in assignments.

I made the supercalifragilisticexpialidocious letters for a friend's classroom along with the Mary Poppins quote below. She's a huge Disney fan!!!

Since teachers return tomorrow, I'll be back in my room finishing up before our Open House Thursday evening.


#MTBoSBlaugust...What Do I Hope to Get Out of Blaugust This Year?

I have been blogging on a small scale for about 3-4 years. I blog basically to have a repository of my thoughts, activities and pictures. There is no greater thrill than being on Pinterest and finding that someone loves you idea and has even added suggestions. I don't think I am followed by many, but I would like to change that. I have to say that Sarah Hagan at Math=Love commented on my classroom photos and made my day!!!!
There are over 100 blogs in my freely that I follow. I often get ideas from them but don't have the connection to be able to bounce ideas off of.  In my past teaching experiences, I have been isolated often being the only teaching in the district to teach a subject. This year I will be co-planning with 2 teachers that will also be teaching geometry. 
My hope for Blaugust is that I can reach out and make those new connections with teachers. I want to become part of a larger group and be able to share ideas to collectively help our students. 

Wednesday, July 22, 2015

Getting My New Room Ready

Other than moving to a larger room, this year is not too different from any other year.  I continue to use a color scheme of turquoise, teal and lime green.  This first photo is of the bulletin board to the left as students walks in my room.  The title is "Data Center" and will contain their grades (using their ID number) by period and changed at the end of each week.  It also contains a reminder to continue reaching their goals that we will set and revise each 9 weeks.  Above the BB are 3 chalkboard butterflies with remnants of 3 vinyl tablecloths behind them for added color.  You'll see the tablecloths further down.


This is a piece of turquoise fabric hot-glued to the wall to create another BB.  This will contain tweets by each of my students, color-coded, of course, by period.  The # is styrofoam that came packed with our airboat radiator.  I have another one that's thicker to use later.  This one I covered with lime scrapbook paper on the front only.  Here is the worksheet I use.


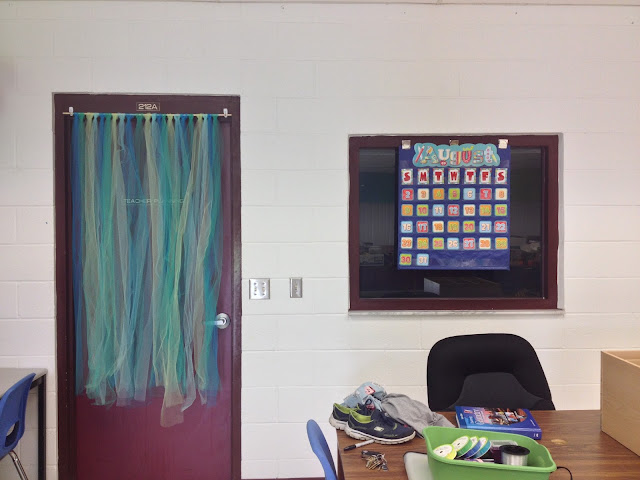
I used 8 rolls of fine mesh in 4 different colors to cover the ugly burgundy doors leading in to the storage room and office.  The other one is further down this wall.  I hot-glued black fabric to the back side of the window, which actually creates an illusion of a two-way mirror.  Since my command hooks won't stick to the window, my Mom used 3 heavy duty magnets to stick my calendar pocket chart to the window frame.


This is the assignment board and my desk area.  I used my Silhouette Cameo to cut out the 11 hexagons, words and letters to create the title.  


Here is a close-up of the title.  My phone camera was acting crazy, not showing true colors.  My daughter fixed it at lunch after these pics were taken.


I bought this at Michaels after wanting it for a couple of years.  It was marked down from $79.99 to $29.99 and I couldn't resist!  I put my colored paper in rainbow order and stored it in these drawers.


The jewelry organizer will hold my clickers and the rotating shoe organizer will hold calculators.  I'm not sure how I will use the lime green organizer yet.  I bought the clothing rack at IKEA for $12.99!


Here's the other door I mentioned earlier.  I created those dodecahedron balls with my Silhouette Cameo also.  They are probably my favorite of all my decorations!!  The GROUPS Expectations poster is actually another piece of turquoise fabric with a green masking tape (from Hobby Lobby) border.


It's kinda hard to read, but the plates spell out my name.  Again I used my Silhouette for those letters and the ones for MAKE YOURSELF PROUD.


 Here is my podium I made years ago, painted to match my decor.  It had some double sided stickies stuck to it so I covered those with 3D flowers and my name again (Silhouette).  My Mom weaved a spring rod through the fabric shower curtain to cover yet another burgundy door.  In the background, you can see the other #.


Finally, here are the three vinyl tablecloths.  They were 54"x108".  I cut off 10" from each (see butterflies).  These are folded in half and hot-glued to the plastic valance, making them come down 27" from the ceiling.  They don't block the light but they do add so much color!


Once I get all the stuff organized, I'll add photos.  The counter is starting to look like it will for the students.  It will contain all the supplies they need each day as well as being the spot where they turn in their work (2 sets of pink trays, also IKEA $8.99 each set).


Friday, May 15, 2015

Colorful Dodecahedrons

A couple of weeks ago, I was looking for interesting ways to gather feedback from my students.  I wanted to get a feel of how my two Geometry Honors classes felt the second half of the year went.  At the semester break, their former teacher left for a family illness and my schedule was revamped to take these two classes.  I fell in love with these students immediately.  They were hard-working, curious individuals that, I have found recently, love a challenge.

So my choice of search for all things awesome sent me to Pinterest!  It was there that I found the colorful dodecahedrons created by 12 inscribed pentagons and numerous staples! So as the pin was on my screen, I opened Geometer's Sketchpad and created this template.   (I later created a larger version for next year.)

I was only planning to have my Geometry Honors classes participate, but I woke up with the beginnings of a migraine and decided my Algebra 2 classes could do the same thing.  I went into school before the kids arrived and made copies on colored paper.  While I was setting my room up for my sub, she walked in.  I briefly explained that each student needed to fill out 2 pentagons, cut the circles out and fold on the dotted lines (pentagon).  For each shape, they were to write about a lesson they learned this year and/or an activity that they enjoyed.


When I came back in the next day, my awesome sub had found my Ziploc baggies, filled each one with a class of pentagons and labelled them!!  For the next two periods, while my students worked on their surface area/volume project, I walked around with a few pentagons and a stapler in my hand, putting together a total of 14 dodecahedrons.  (It took over a day to staple them all.)  As I was walking around, my kids asked questions about the shape that I was creating.  So, I showed them a finished one and asked them to guess how many pentagons made the solid.  They were really into guessing and many got it right the first time.  I then asked what it was called.  After a couple seconds they were able to tell me dodecahedron (some said dodecagon first and I just waited).

The next day during my planning period, which fortunately is attached to my lunchtime (!!!), I hung them from the ceiling with fishing line.  I thought 14 would be too many, but once I got them all up, I wished I had more.  That's why I created a larger version of the inscribed pentagons so it would fill up more space, plus the students would be expected to write more details.

I have passed this project idea along to a couple of colleagues and look forward to sharing with other teachers during post-planning this year, or pre-planning next year.  While this is not my original idea, it is an original template.

I need to pull one of them down and count the number of staples.  That will be a question I ask my students.  I love to listen to them explain their thinking!


I loved reading this "fact" she learned!!

I wrote about the Four Fours activity here.


Some were just sweet comments...


Piling 'em up!


See how small they are once they were hung up?  Definitely gonna make larger ones next year.


Panoramic picture of my classroom from my exterior door.

Tuesday, May 5, 2015

Matrices

As the year draws to a close and EOC tests are done, my Algebra 2 classes will be conquering matrices and its role in cryptography.  Matrices were not tested on their EOC, so it was saved till now.

In anticipation for starting matrices tomorrow, I began last year revamping my old lessons.  I pulled out examination textbooks I have collected over the years to find multiple step word problems and hit the internet for areas that use matrices.  The first document was 4-part notes.  After each part, a discussion would be held and a formative assessment sheet would be given.  Here is the lesson plan I shared with a friend that also teaches Algebra 2 at my school:

Lesson Plan for Matrices Unit
Matrices Inquiry worksheet are the “notes”.
Day 1: Part 1 Matrices Inquiry, CW/HW Data in Matrices Sheet
Day 2: Part 2 Matrices Inquiry, CW/HW Matrix Add, Subtract & Scalar Mult. Sheet
            HW: watch video (https://www.youtube.com/watch?v=kuixY2bCc_0)
Day 3: Part 3 Matrices Inquiry, CW/HW Matrix Multiplication (pgs. 1-2)
Day 4: CW Matrix Multiplication Sheet (pgs. 3-4)

The 12-page zip file can be found at my TPT store.
Matrices Inquiry Notes - 4 pages
Data in Matrices - 2 pages
Add/Subtract/Scalar Multiplication - 2 pages
Matrix Multiplication - 4 pages

Below is a preview of Part 2 of the Matrices Inquiry Notes:

I will be continuing to add to this lesson to include determinants and inverses of a 2x2 matrix, to get to the fun cryptography part.

Friday, May 1, 2015

Four Fours Worksheet

My Geometry Honors students took their EOC this past Monday and Tuesday.  So the rest of this week, I have been giving them miscellaneous mini challenges, nothing too deep.  One day they had to find a buried treasure using geometric constructions.  Today, I gave them the Four Fours Worksheet.  All students were engaged with this worksheet, even those that mentally drift off.  They were getting frustrated ("I'm gonna break this calculator!", "This is harder than the EOC!"), but they would not let it beat them.  The office called to tell me one of my girls was checking out.  She is typically chatty and not-so-engaged.  She told me, "I only have 2 more to find and I'm not leaving till I get them!".  She checked out 5 minutes later, AFTER she found the last two!  Needless to say, it was a good day!  Here's the link to my version of the Four Fours Wkst.

Monday, April 20, 2015

Promise to Start Blogging Again...More Often

Over the past year, I have gone through many changes.  All of them have been for the best, even though lots of stress was involved!

  • March - bought a new car and gave my paid-off car to my daughter.
  • April - my divorce was final, hence the blog name change.
  • May - was told my teaching contract wouldn't be renewed for the following year (gotta love a superintendent that's kin to everyone!)  I had been at that school for 6 years and the district had decided not to offer tenure to new teachers at 3 years of service.  BTW, I was voted Teacher of the Year during my third year!  I see where that got me!!  Of course, it was during the previous superintendent's reign.
  • June - my "baby girl" graduated from high school, moved to a town 15 minutes away, into a condo I own and I moved out of a rented home and out of my classroom in less than a month's time (It's amazing how much "stuff" we collect over years of teaching!). I started my Masters degree online through University of Florida and began job hunting.
  • July - I was offered my current job in the same town that my daughter moved to, where my parents live and I grew up.  I actually graduated from the high school I work at now.
  • August -  school started and I began teaching Algebra 2, which I have not taught in 5 years.  My teaching philosophy and style has changed tremendously, so it was like I had to start fresh.  Even though I LOVE my new school, it has been extremely stressful.  In the fall, I battled tension headaches that would frequently turn into a migraine, sometimes 6 days a week.  Now that they are under control and I have adapted to the extra work time involved in my Masters, I want to start blogging again.  
I hope to find out soon what I will be teaching next year.  I think there will be an overload of Geometry students due to the revamping of the high school math sequencing (Alg 1, Alg 2, Geom).  I hope to have all Geometry classes.  In preparation for planning for next year, this weekend, hours were dedicated to reorganizing my computer files.  I deleted so many files that I gained 7 GBs of space!  There were so many files in my downloads, many of which I had forgotten about, that it was like Christmas going through them!

In future posts, I will share many ideas I have learned during my past 6 Masters classes.  Hopefully, this will help cement the learning with me and help me to prepare for next year.  Lots of ideas are flying through my mind, so it may take a little while to start organizing them.