Friday, July 22, 2016

Decorating My Classroom (Part 2)

Well, I went back to my classroom today.  This time the A/C was on and it felt good!!  The only bad thing is they were testing the bells and I realized I only have one more week at home before I go back to work on August 2nd! Ugh!

I stopped by the Dollar Tree beforehand, picking up 2 magazine holders (small, only a little over 8.5"), some party birthday cups (in red, yellow and green) and a new bulletin board border.

These were too cute to resist with their mathy decor.  You can see in the second picture that I put a yard stick next to it so you could see the width.


I have resisted the use of red, yellow and green cups in groups for years.  My Mom used them over 10 years ago in the computer lab at an elementary school.  I plan on using them when students are in groups, each group getting one of each color.  Green means they are doing fine, yellow means they may need help soon and red means they are stuck.  I want my students to learn to communicate and work together, so they must come to a consensus about what they want to ask before they put the red cup on top.  When I get to the group, I will answer questions from one person.  This means that they will have needed to discuss it prior to me coming over.


I used this new border to cover up some of the (ugly) burgundy around this window.  I don't like that the calendar isn't centered.  Right now its held up with strong magnet clips, but I'm going to try to get command hooks to stick to it.


I am the most proud of this section of the room.  I freaking LOVE these colors together and am amazed that they match so well, being made of plastic tablecloth, paper, duct tape (on top of table) and tutu netting!  


The day before, I created many posters, some inspirational (in blue, teal and lime green) and some necessary rules (in yellow, oranges, red and hot pink on another wall).  Some of those posters were found from different sources on the internet.  The 1st, 3rd, 5th and 7th posters are from Light Bulbs and Laughter and is a free download.  The "Strengthen a Dendrite" poster was downloaded free from here (as soon as I find the tweet/blog I found the link in, I will give credit...SORRY!).   At the end I will give links to the posters I created for free download.


I love this set of posters about respect and the main color is lime green!  I downloaded it for free from Digital Divide and Conquer.  I printed them two-to-a-page so they are half the size they were designed to be.  I wanted them to line up with the side of my assignment board.


The WELCOME posters on the front of my desk came from Sarah Carter at @mathequalslove.


I have an unhealthy love of pocket charts!  This one is huge and will hold the vocabulary for multiple units.  Each unit is a different color, so there are 5 units shown here.  The remaining units of vocabulary words are in the container sitting on the end of the table.


I've now designed the WORD WALL title and unit numbers and will cut them out with my Silhouette Cameo (a machine that no teacher should be without!!).  You can see the measurements on both the title and the group of unit numbers.  (More pics later...)


This is a view of my assignment board (still waiting on my magnet strips to come in!), the RESPECT posters and the word wall.


The Mathematical Practices are on the posters below the board.  My new last name is on teal chevron party plates above the board and at the top is a sign I made last year.  It says, "Make Yourself Proud".  I think it fits in well with my Growth Mindset approach and inspirational posters.


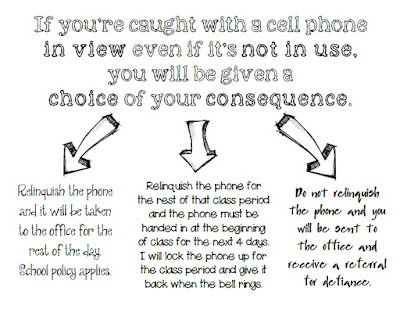
And of course, we have to have rules and expectations.  Here are posters of the policies: for tardies, for cell phones, for food/drink, for restroom passes and for backpacks and purses.

Still on my list of things to do:
  • Put teacher computer on the podium (large one I built several years ago)
  • Spray paint file cabinets (not inside, even though Magic Erasers help get overspray off the freshly waxed floors)
  • Put up Word Wall title and unit numbers
  • Finish the assignment board, including titles: M, T, W, T, F, Agenda, I Can, EQ, Power Hour Schedule, etc.
  • Draw out the brain (using the projector) and finish Growth Mindset bulletin board
  • Hang my ROBERTS pegboards (4 of the 7 fell using Command velcro, UGH!)
  • And any other crazy idea I can come up with!

Free Poster Downloads (all in PDF form):

Choices, Chances, Changes


Before You Leave


Cell Phone Consequences


No Cell Phones

Challenge & Change

Chooser

Easy Learning


Errors


Fair Is...


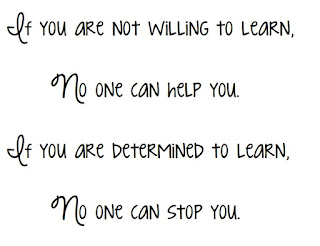
Not Willing, Determined

Instead of...


Make Mistakes


Mustache


No Purses/Backpacks


Restroom Passes


Results or Excuses


Tardy Policy


Food/Drink Policy


Absent


Attitude


Math Anxiety


Relationships & Using a Formula


Sorry about the crazy formatting of the posters.  I wanted to go ahead and publish this post, so I'll work on the formatting later to satisfy my OCD-ness!!

Saturday, July 16, 2016

Decorating My Classwork (Part 1)

Today, while my husband went on a fishing trip, I decided to go to my classroom and get some decorating done. I didn't think about it being on the weekend and the A/C not being on!! I had so much to do, so the heat didn't scare me away.  I had a list of things I wanted to accomplish in Google Keep and didn't even consult that list until I thought I was done.  Of the 15 things on my list, I completed 11 plus other things I noticed once I got in there.

For a few years now, my colors have been turquoise, teal and lime green.  Every year I buy new variations of those colors and freshen up the decor.  I found a new pattern of duct tape at Walmart the other day.  It's black geometric designs with turquoise and lime green!  After I added this new light turquoise fabric to a table, I used the duct tape to add pizzazz to the top of the fabric on this table and the lime green one.


Around Christmastime, I bought a whole bunch of pegboards from Target.  I gave my daughters enough to cross-stitch their kids' names and I had enough left over to stitch my new married name.  I chose to sew with 1/8" ribbon in the space around each letter.  I also didn't center the letters to add variety.  I used Command picture hanging strip to stick them to the wall.


This is a 'sketch' of my assignment board.  I wanted to switch up the layout of it this year.  In the past, I've used Washi tape to create the separations between the sections.  Last year I had bought lime chevron magnetic strips that I thought were cool.  I used those to lay out my design.  In doing that, I realized I didn't have enough, so as soon as I got home I looked them up online and ordered 2 pks of turquoise and 2 pks of magenta.  I got them here.  Once I have the three colors, I can finalize my design.  The reason I love the magnetic strips so much is that I can rearrange my board EVERYDAY if I wanted to!!  So much better than taping (that's never straight!) and having to buy more when I want to redo it!


This is a view from my door.  The table on the left under the bulletin board will be getting a tutu skirt around it on the next trip.  A sample of the tutu is shown below.


Because my teacher-neighbor won't be returning next year, I raided his classroom to get tables that matched mine.  I took my mismatched ones over to his old room!  I'm a little bit OCD and last year the tables drove me crazy!!  Now I have 14 2-person tables, which I set up into 7 4-person groups. There is so much room to walk around the tables so I shouldn't be tripping on backpacks all year!


Behind my GATOR flag was a huge mess of blue internet cables.  This was one of the things not on my list but needed to be cleaned up.  It took about 10 minutes to get them either pushed into the ceiling or tucked into the grey sleeves.  It was such an improvement.  I moved my flag into this spot to kinda hide the grey sleeves.  Now I have a huge blank space on that wall.  I look forward to creating something to fill it!


This is one of my MANY pocket charts.  This year I am pulling it back out for a Word Wall.  I have hundreds (no kidding) of sentence strips from Dollar Tree that I will be writing all the vocabulary words on, to place in the clear pockets.  This was another thing not on my list.


I haven't decided what I want to put on this bulletin board.  Last year, I titled it DATA CENTER and put grades (by lunch number) or my list of clicker numbers on there as needed.  Sometimes it contained a new seating chart when I got tired of the current one.  The table held all the handouts for that day, so students would picked them up as they walked in.  It saved time and disruptions by not having to pass papers out.


This board is actually a whiteboard whose surface has seen better days.  I can't even use it without having to spray cleaner on it to get marker off.  I hot glued black bulletin board paper over it to create a Growth Mindset bulletin board I purchased from Teachers Pay Teachers (link).


I'm contemplating whether or not I want to use this owl border for the Growth Mindset bulletin board.  I'll probably create the board then decide.  The colors do match perfectly though!


And finally, a panoramic photo right before I left for the day.  I truly hate the mauve and burgundy countertop and cabinets!  They seriously clash with my awesome blues and greens!!!  If I could cover or paint them, I certainly would!


Monday, July 11, 2016

Sorting Triangles Pre-Assessment

I have used the basics of this activity as an individual activity as well as a pair activity.  In the individual activity, each student received a copy of the sorting template and the 7 different types of triangles.  The sorting template was a half sheet that would be glued into their interactive notebooks.  They had to write in the two categories in which they would sort the 7 words and glue those onto the sorting template.  I would check their work before gluing it down, but some students glued first.

The pair activity was more successful with my students.  I only had to print and cut out 15-20 sets.  If they were laminated, they would last longer.  If not, students frequently wrote what they thought to be the correct answer on them.  Being a class set, this required me to reprint and recut to replace messed up sets or ones with lost pieces.

As I began planning for the upcoming school year, I found Google Classroom and digital interactive notebooks.  I knew this was for me because I love introducing my students to new useful technologies and it would save large amounts of money used in buying the paper, glue, tape, etc.


Students would work in pairs and decide which two categories into which these 7 words can be separated.  Each student would be responsible for completing their own activity even though they are working together.  Students will drag and drop each of the 7 words into the correct category.  Once that is done as a pair, students are to write their own reflection, explaining their reasoning.

SMART Goals Interactive Digital File

If you search for "SMART Goals" in Pinterest, you will find a huge selection of documents that you can use with your students to help them develop goals for each grading period.  Last year I designed a half-page document that students filled out and taped into their spiral interactive notebook.  Each 9 weeks, they would cut the tape and remove the goal.  They would fill in their reflection at the bottom and receive another one for the current nine weeks.  That file can be found here.

This year, I will be using Google Classroom to assign tasks for my students.  This allows me to create digital interactive documents in my Google Drive for my students.  With the digital interactive version, my students won’t need glue or tape and they will always have their “notebooks” with them as long as they have access to technology and wi-fi!  No more wasted money on excessive supplies or wasted time waiting for students to cut and paste.  Another advantage is that students can update their goal during the grading period.  In the paper version, it would be permanently written and glued down.

The digital version is available here in my TpT store.  Below is what the digital version looks like. Students will be able to click on each line to input information in the text boxes.  On the My Reflection page, student will move the red checkmark into the appropriate blank.


Thursday, June 30, 2016

FREE Google Digital Interactive Basic Geometry Figure Activity

In a previous blog post (here), I wrote about a review activity I had created for my students to cut and paste into their spiral interactive notebooks.  This summer I am taking many of my old "paper" versions and converting them into "digital" versions.

You can find this activity here for free.  Please let me know what you think and keep checking my blog and my TpT store for more!


Tuesday, June 28, 2016

Google Digital Interactive Geometry Files

Just before the end of school, I started thinking about this coming year as I do every year.  I get most of my inspiration from Pinterest and several blogs I read.  I happened to come across a TpT file by Jennifer Kimbrell @TechwithJen.  (You can buy that file here.)  She explains in the video in her file how to create interactive notebook files to be used in Google Slides.  I was hooked!!  I started searching for more files, only to find that there aren't many Geometry files out there, yet!  I came across and purchased another file on TpT by Danielle Knight @StudyAllKnight.  (That file can be purchased here.)

I, then, set about to convert some of my interactive (paper) notebook files into digital interactive files!
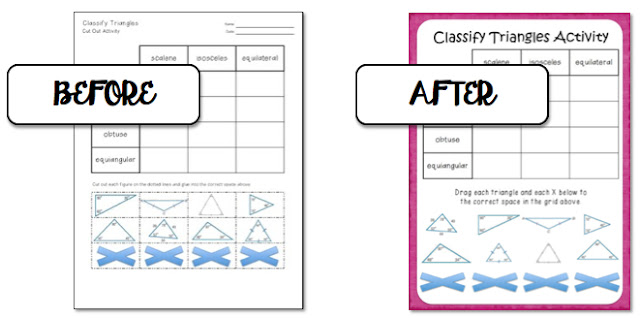
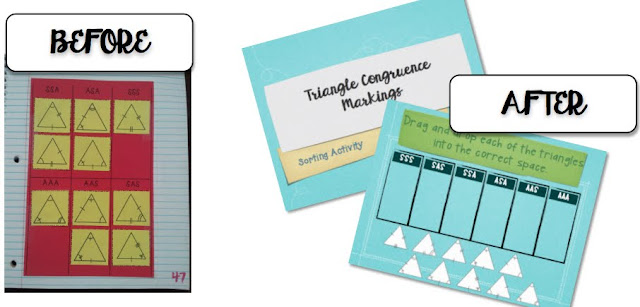
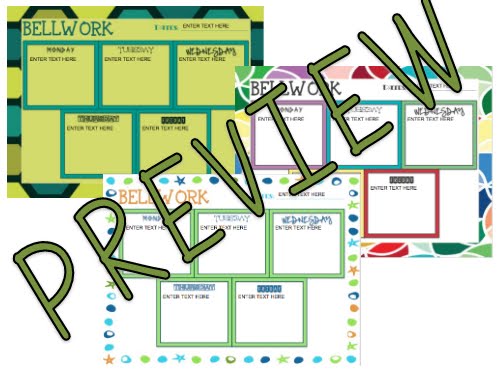
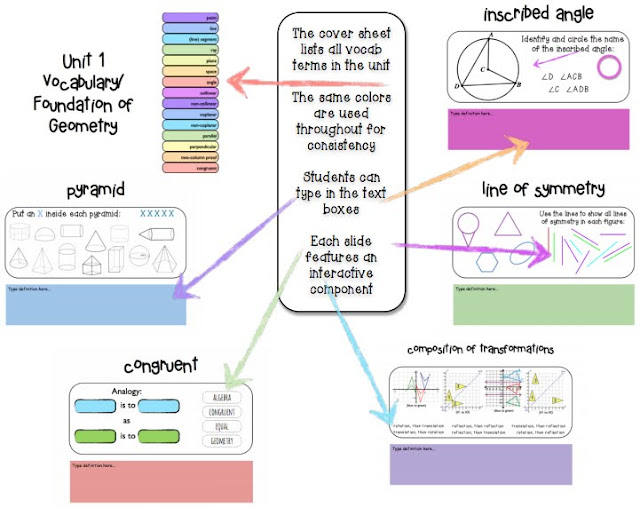
So far I have converted my Classifying Triangles and Triangle Congruences Sorting Activities.  I've also created 10 bellwork templates each with a different background for variety.  The file I'm the proudest of is the 13 units of interactive vocabulary.  In the downloadable preview, I give the list of vocab words by unit.  Every single vocab term has a text box where students can type the definition and some other interactivity, including circling items in a diagram, moving arrows to point to parts of a diagram, drag and drops and fill-in-the-blanks.

Click on the photos below to go to the TpT link to purchase.

Classifying Triangles Activity


Triangle Congruences Sorting Activity


Bellwork Templates


Vocabulary


Advantages of the Google Digital Version


  • saves money for teachers and parents because there's no need for a spiral notebook, tape, glue, lots of colored paper or scissors.
  • saves time during class that students waste cutting and gluing.
  • there will not be any lost pieces all over the floor.
  • are more colorful.
  • uses technology.
  • students have access anywhere they have internet, even on their phones.
  • students won't lose the files because they are kept on their Google Drive rather than at the bottom of a backpack.
  • students can do and redo these activities because they aren't glued down after the first attempt, making it a learning activity AND a review activity.
  • easier for students to read their work because it doesn't involve their handwriting.
  • they are more fun!


Saturday, September 12, 2015

Parallel Lines Activity

Today, all 6 of my geometry classes were supposed to take a quiz on angle relationships when parallel lines are cut by a transversal and move on to parallel, perpendicular or neither.  I knew yesterday by 2nd period that they wouldn't do well if I forced them to take the quiz at the beginning of class today.  So a plan was hatched and a trip to Dollar Tree was planned.

The plan was to tape the floor with two parallel lines cut by a transversal.  The more I thought about it, the more pieces I created.  The trip to Dollar Tree only yielded a roll of pretty duct tape and a roll of navy blue masking tape.  I went there to look for more traffic cones, but they were all gone.  I had bought 8 traffic cones from there about 4 years ago and have never used them!  Finally, they had a use!! I had 2 red, 2 orange, 2 yellow, 1 blue and 1 purple and I needed them in pairs.  So I could only use the red, orange and yellow ones and it worked just fine.

Here's a pic of my floor taped.  Those are electrical plugs in my floor!


Here's a pic of my "tools".  Six signs with angle pair names, 3 pairs of colored cones, a timer to keep us on track, post-its for solving (one pair for congruent angles, one for supplementary) and student names on strips to pull at random (color-coded by class).  The next pic is of student whiteboard and marker storage. 


The students grabbed a whiteboard, marker and a chair and sat in a semicircle around the taped lines.  I explained how it worked and we got started.  I would show everyone a sign with an angle pair and place it on the floor.  Then, 2 random students were chosen and given cones.  They would place the cones in the correct angles.  If they had trouble on the first round, they could get help.  Once the cones were placed, they were asked if those angle were congruent or supplementary.  At that point, I would stick the post-its and have them use the whiteboards to solve for the variable.  In some classes, we got thru the first round without anyone needing help so I would give two cones to a student and have them challenge another student.  They would place their cone then challenge a student to find an angle that was, say corresponding to it.


I had one student that is hard to reach tell me that it was fun and thanked me for doing the activity!!!!  I had so much fun and it was such a productive activity (grades on quizzes after activity were better than expected!) that I invited my math coach and fellow geometry teachers to watch during their planning period.  They plan on using it next week for their students as well!!

What a perfect way to end the week!! SUCCESS!!